PX4 Integration
Pictorus now offers the ability to integrate a Pictorus model as a PX4 module that can run on the PX4 platform - both in the Gazebo simulator and on physical hardware.
Getting Started
A fully working Pictorus PX4 integration will require a PX4 development environment, which typically involves setting up a Linux environment with the necessary tools and dependencies for building PX4 firmware. You can follow the official PX4 setup guide to set up a local environment.
The following examples were built using a Debian based Linux. The examples also uses a PlayStation controller to provide manual control inputs to the PX4 simulation and physical hardware.
Create a PX4 Model in Pictorus
Pictorus PX4 modules use Rust bindings to subscribe to and publish uORB messages. uOrb is PX4's native communication protocol for inter-module communication. It is a pub-sub system, where "topics" are used to advertise and receive specific message types . We are building a simple model that subscribes to the Sensor Gyro and Manual Control Setpoint uORB topics. These subscriptions bring data into the model, where it is modified and converted to PWM timing values. Finally, those values are published to the Actuator Motors uORB topic, this exports data from the model, back into the the broader PX4 system.
- Create a new model in Pictorus.
- Open the
App Settingsfrom the left sidebar and change thePlatformtoPX4_Linux. This will change the defaultInputandOutputblock set to PX4 compatible blocks. - Drag and drop a
uORB Inputblock from the left sidebar into the model. Double click on the block to open the block parameters and selectSensor Gyrofrom theMessagedropdown. This will configure the block to subscribe to theSensor GyrouORB topic. - Drag and drop another
uORB Inputblock into the model. Double click on the block and selectManual Control Setpointfrom theMessagedropdown. This will configure the block to subscribe to theManual Control SetpointuORB topic. - Drag and drop a
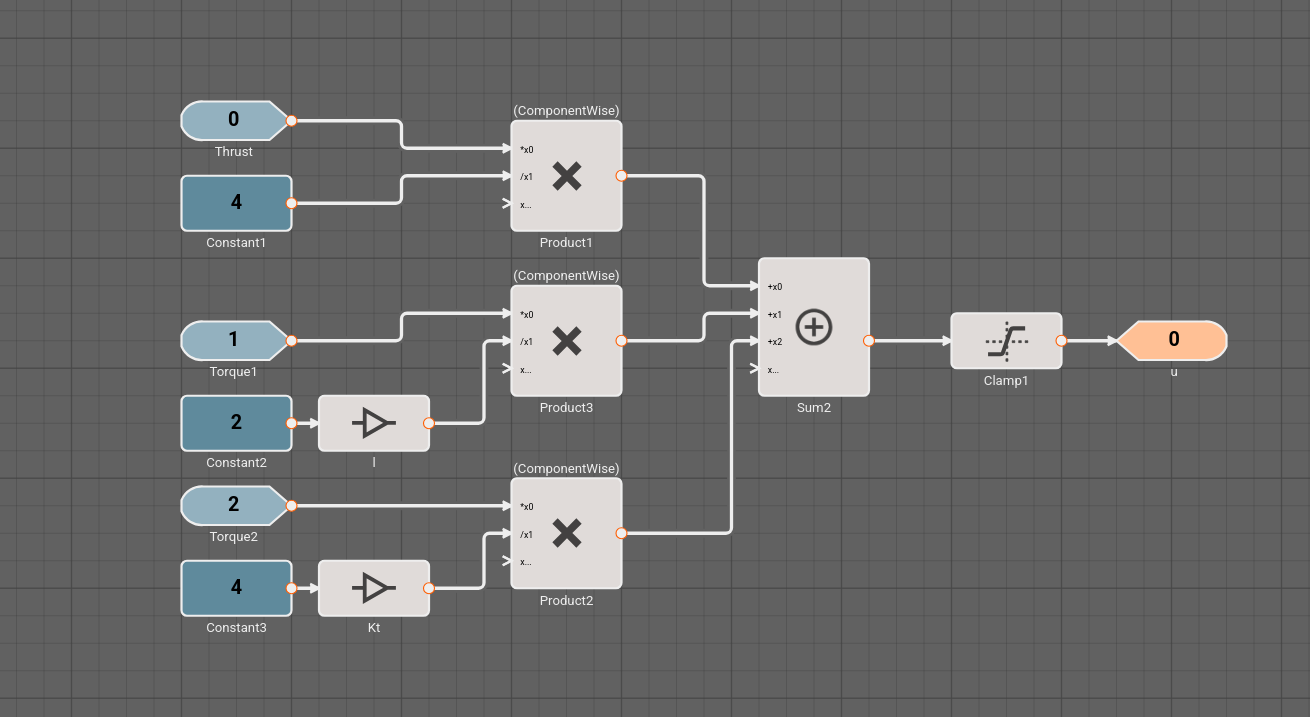
uORB Outputblock into the model. Double click on the block and selectActuator Motorsfrom theMessagedropdown. This will configure the block to publish to theActuator MotorsuORB topic. - Build out the rest of the model to process the input data and generate PWM duty cycles. Below is an example of basic model that can be used as a starting point. PX4 documentation discusses existing models and control strategies that can also be used in Pictorus.
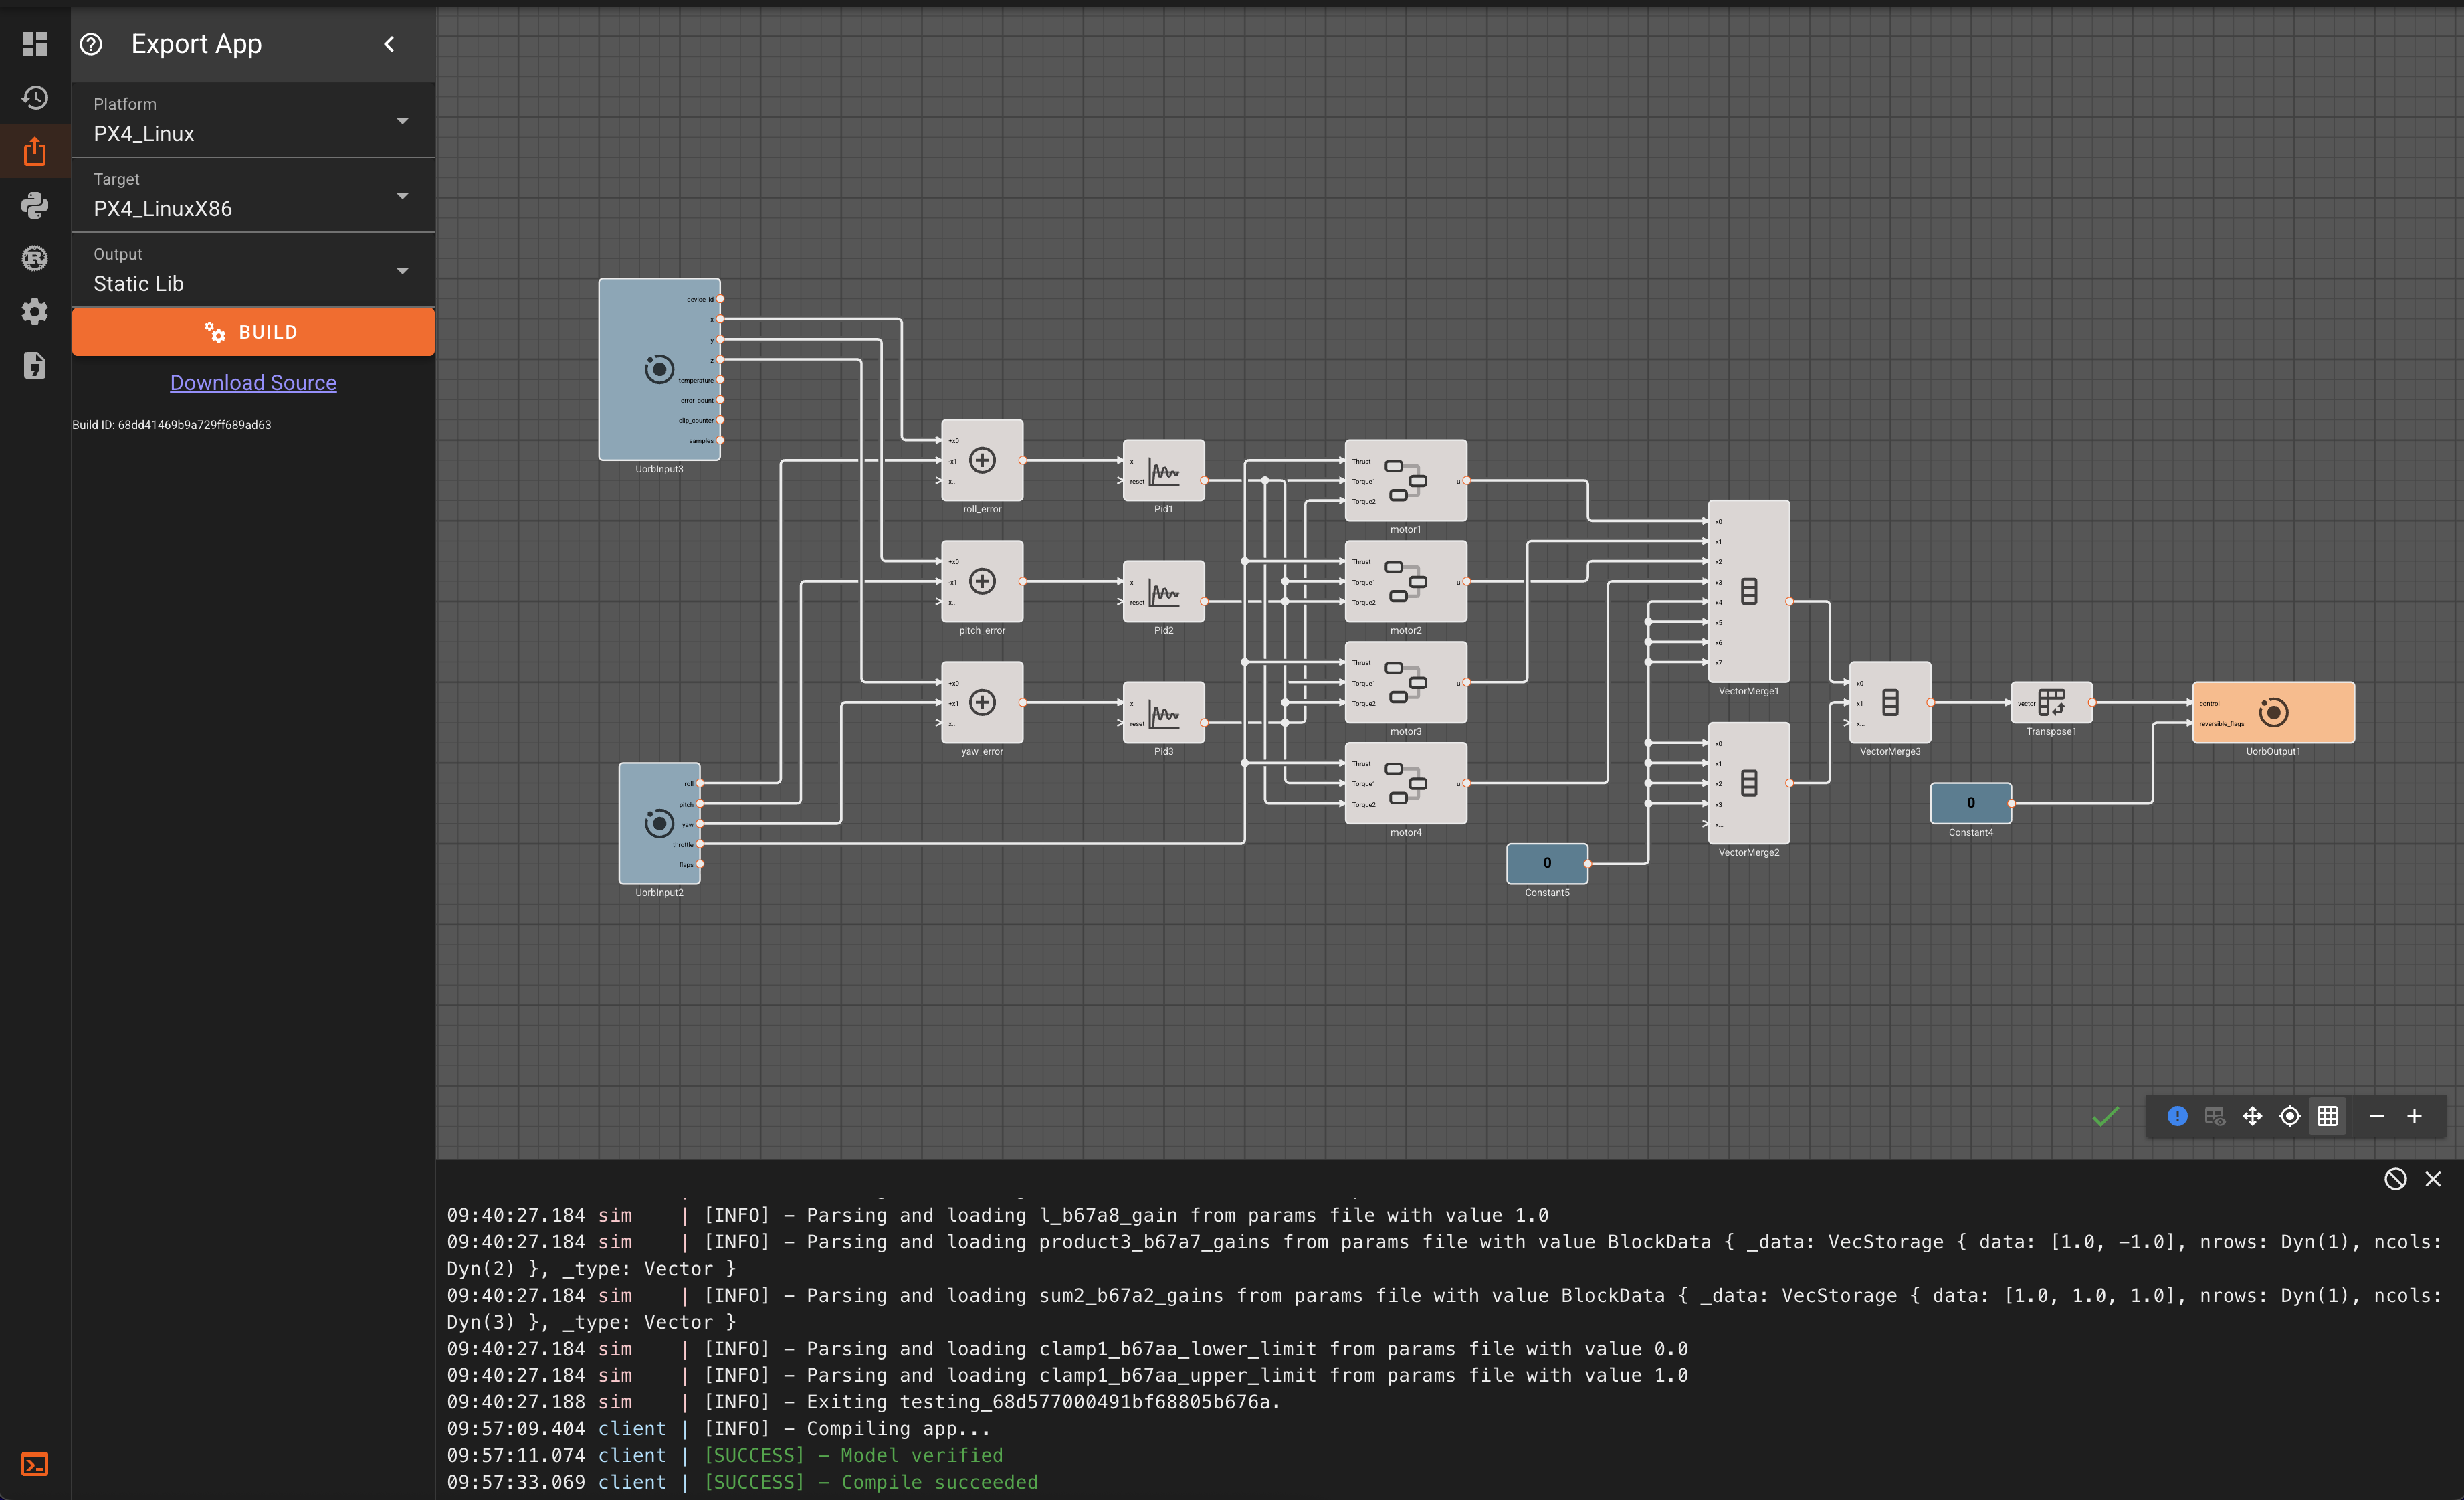
Note:
- The
Actuator MotorsuORB topic expects a 12x1 array of floating point motor PWM values. We use aVector Mergeblock to merge the 4 motor commands with 8 zeros to create a 1x12 array and transpose it to a 12x1 array using aMatrix Transposeblock. - The order of the motors should match the order expected by PX4. You can run
QGroundControlbefore proceeding to the next section which will show the motor order. This is why component outputs 2 and 3 are swapped going into theVector Mergeblock. This image shows the motor order for the x500 simulation drone.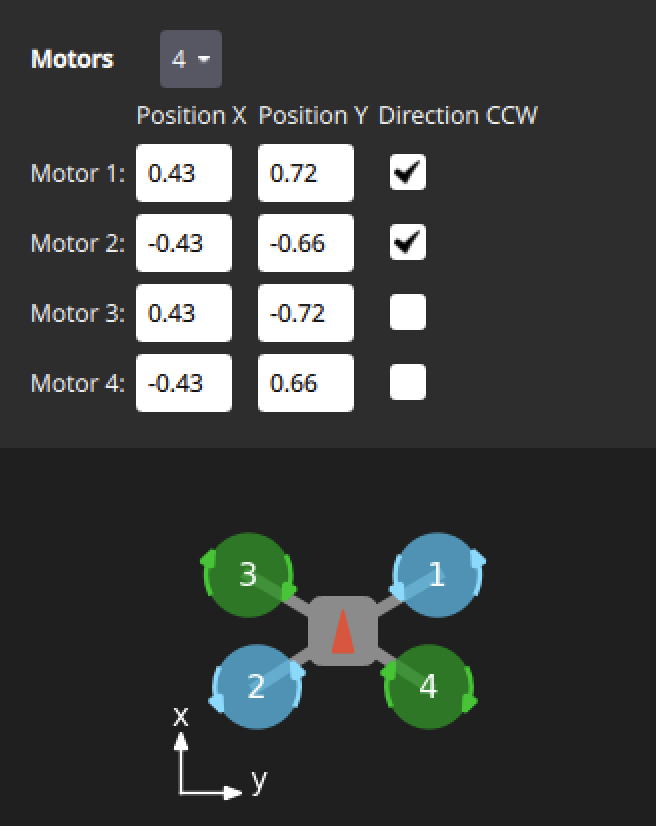
Testing a Pictorus Model using Simulation in the Loop (SITL)
Once you have created your PX4 model in Pictorus, you can export it as a static library that can be linked into the PX4 framework. Pictorus compiles the model to Rust and provides C Foreign Function Interface (FFI) bindings and PX4 model shim code to make it easy to link the generated library into PX4 as a module.
Additional Requirements
- QGroundControl: Provides additional tools for interacting with the simulated drone, such as mapping control inputs from a controller to the simulation environment.
- PlayStation Controller: This example uses a PlayStation controller for manual control inputs. Other controllers may work, but additional configuration may be needed.
Configure QGroundControl to use the PlayStation Controller
- If you have a controller connected, go to
Vehicle Configuration->Joystick->Active Joystickand select your controller from the dropdown menu.
Export the PX4 Model for testing in the Gazebo simulation environment
- From the Pictorus web UI, open
Export Appfrom the left sidebar. - Select
PX4_Linuxplatform. - Select
PX4_LinuxX86as the target if the Linux computer running PX4 and Gazebo is x86 based. SelectPX4_LinuxARMif the Linux computer is ARM based. - Select
Static Libas the output type. - Click
Buildand wait for the build to complete. - Once the build is complete, click
Download Sourceto download the generated source code in a zip file. The PX4 zip file contains:
lib.rs: The Rust model codelib<model_name>_<app_id>.a: The compiled static librarymodule_shimfolder: Contains the C FFI bindings and PX4 wrapper code to link the static library into PX4.
- Create a new folder in your
PX4-Autopilotrepository, for this example we will createPX4-Autopilot/pictorus_x86and extract the contents of the zip file into this folder. - Open a terminal in the
PX4-Autopilotfolder and run:make px4_sitl gz_x500 EXTERNAL_MODULES_LOCATION=./pictorus_x86/module_shim. This will build PX4 with the Pictorus module included and launch Gazebo populated with an x500 drone model. This terminal will also act as the PX4 console for the simulation for subsequent steps in this section.
Note: The
EXTERNAL_MODULES_LOCATIONdoes not need to be at./pictorus_x86/module_shim, it just needs to point to themodule_shimfolder.
- Stop the built in PX4 multi-copter controllers by running the following commands in the PX4 console:
mc_rate_control stop: Disables the multi-copter rate controllermc_att_control stop: Disables the multi-copter attitude controllermc_pos_control stop: Disables the multi-copter position controller
These modules are also trying to publish to the Actuator Motors uORB topic and will conflict with the Pictorus module.
- Arm the drone by running
commander arm.
Optional: To prevent from having to disable the mc_*_control modules every time, you can modify the Simulation startup script located at PX4-Autopilot/build/px4_sitl_default/rootfs/etc/init.d-posix/rcS and add the following lines at the end of the file:
mc_rate_control stop
mc_att_control stop
mc_pos_control stop
commander arm
This should disable the multi-copter controllers and arm the drone automatically when the simulation starts.
- Start the Pictorus module by running
pictorus_module startwhich runs the Pictorus module, launching the model and publishing motor commands to theActuator MotorsuORB topic. - Gently provide some throttle using the PlayStation controller to see the motors spin up and observe the motors when changing the roll, pitch, and yaw inputs.
- To stop the Pictorus module, run
pictorus_module stop.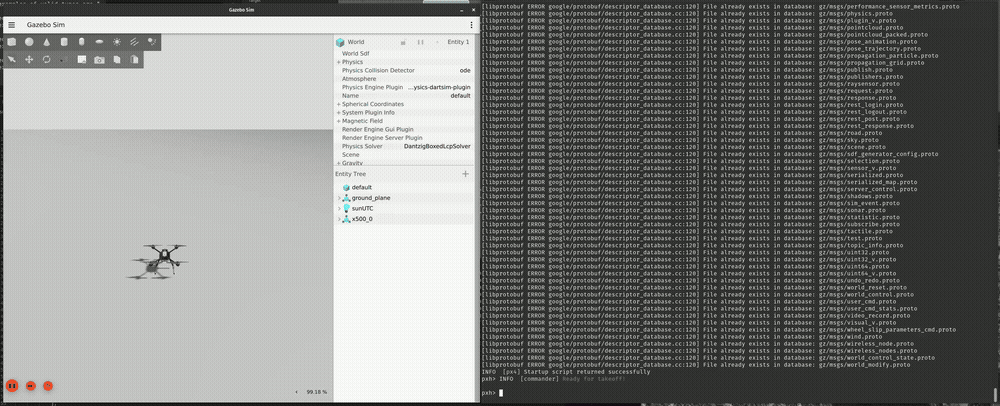
Deploy the Model to PX4 Hardware
Once you have tested your PX4 model in the Gazebo simulator, you can bundle the Pictorus model into deployable PX4 firmware to run on physical hardware.
Additional Requirements
- Physical Hardware: This example uses a Holybro Pixhawk 6X-RT flight controller.
- QGroundControl: Can be used for uploading firmware to the flight controller and interacting with the PX4 shell on the hardware.
mavlink_shell.pyscript: This script can be used to connect to the PX4 shell over MAVLink and is an alternative to using theQGroundControlconsole.- Logic Analyzer (Optional): A logic analyzer can be helpful for debugging PWM outputs to motors.
Deploy the Model to PX4 Hardware
- Open the model from the previous section in Pictorus.
- Open
Export Appfrom the left sidebar. - Select
PX4_STM32platform. - Select the appropriate target for your hardware. For the Pixhawk 6X-RT, select
PX4_STM32H7.
Note: We are reworking this to be more intuitive. The 6X-RT uses a Cortex-M7 processor, which is why we select the PX4_STM32H7 target. The PX4 library does not interact with any chip specific peripherals, the processor name is a stand-in for the chip architecture and instruction set when compiling the static library.
- Select
Static Libas the output type. - Compile the model by clicking
Buildand wait for the build to complete. - Once the build is complete, click
Download Sourceto download the generated source code as a zip file. The folder structure is the same as the previous section. - Create a new folder in your
PX4-Autopilotrepository, for this example we will createPX4-Autopilot/pictorus_armand extract the contents of the zip file into this folder.
QGroundControl Firmware Upload
QGroundControl can be used to upload the generated firmware to the flight controller and interact with the PX4 shell on the hardware.
- Open a terminal in the
PX4-Autopilotfolder and run:make px4_fmu-v6x EXTERNAL_MODULES_LOCATION=./pictorus_arm/module_shim. This will build the PX4 firmware with the Pictorus module included and generate apx4_fmu-v6xrt_default.px4firmware file in thePX4-Autopilot/build/px4_fmu-v6x_defaultfolder. - Open
QGroundControland navigate to theFirmwaretab underVehicle Configuration. - Unplug and re-plug in the flight controller to enter the bootloader mode.
- Check the
Advanced Settingsbox and selectCustom Firmware Filefrom a now visible drop down menu and navigate to thepx4_fmu-v6xrt_default.px4firmware file generated above. ClickUpdate Firmwareto upload the firmware to the flight controller.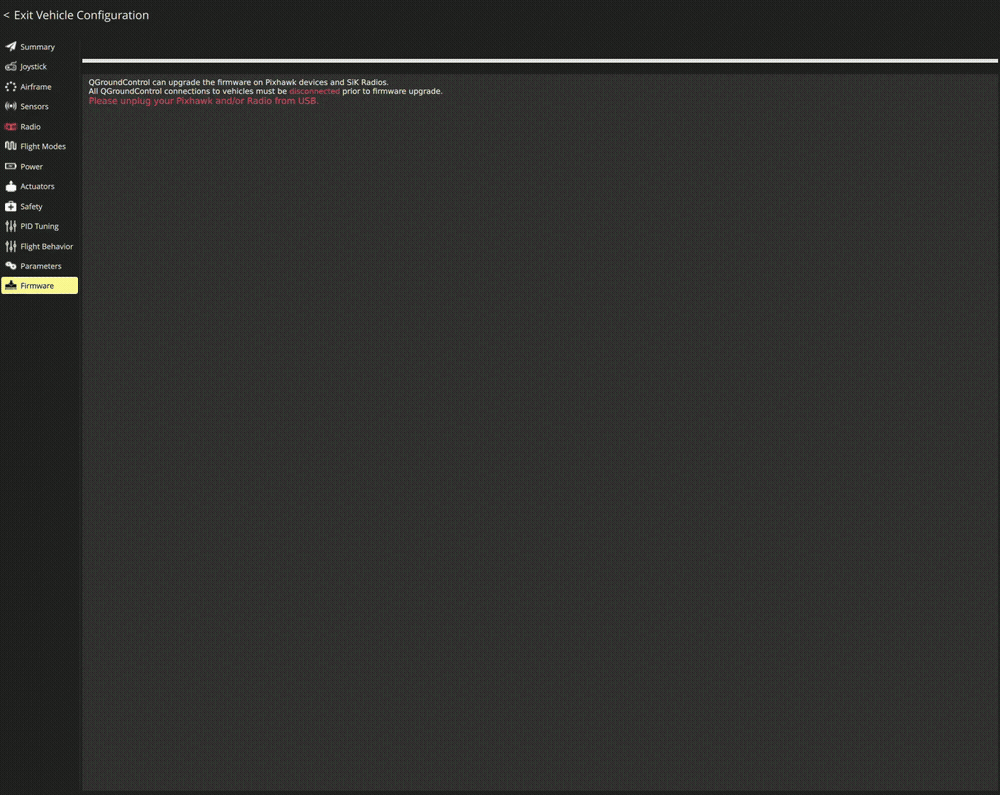
- After the firmware is uploaded and the flight controller reboots, go to
Analyze Toolsand select theMavlink Consoletab.
Console Firmware Upload
Alternatively, you can use the make file upload command and mavlink_shell.py script to upload and interact with the flight controller. The PlayStation controller probably won't work with this method without additional configuration settings and input mapping not covered in this document.
- Ensure the flight controller is connected and open a terminal in the
PX4-Autopilotfolder and run:make px4_fmu-v6x EXTERNAL_MODULES_LOCATION=./pictorus_arm/module_shim upload. This will build the PX4 firmware and attempt to upload it to the connected flight controller. - Once the upload is complete, you can use the
mavlink_shell.pyby running./Tools/mavlink_shell/mavlink_shell.py <flight_controller_serial_port>, replacing<flight_controller_serial_port>with the serial port of your flight controller (i.e./dev/ttyACM0) from thePX4-Autopilotfolder. This will open a PX4 shell connected to the flight controller over MAVLink.
Starting the Pictorus Module on PX4 Hardware
Once the firmware with the Pictorus module is uploaded to the flight controller, you can start the module from the PX4 shell.
WARNING: Running a new flight model on physical hardware can be dangerous and unpredictable while the model is under development and being tuned. Ensure the vehicle is restrained and cannot take off or cause harm to people or property. Always have a way to cut power to the motors in case of unexpected behavior.
- Stop the built in PX4 multi-copter controllers by running the following commands in the PX4 console:
mc_rate_control stop: Disables the multi-copter rate controllermc_att_control stop: Disables the multi-copter attitude controllermc_pos_control stop: Disables the multi-copter position controller
Optional: To prevent from having to disable the mc_*_control modules every time, you can add a file to the flight controller's SD card called /etc/rc.txt and add:
mc_rate_control stop
mc_att_control stop
mc_pos_control stop
commander mode manual
This script will run commands in the rc.txt file at boot and put the vehicle in manual mode, which makes it easier to visualize the motor outputs through subsequent firmware updates. commander mode manual puts the vehicle in manual mode, which is useful for testing motor outputs, but may not be safe for flight or the surrounding environment.
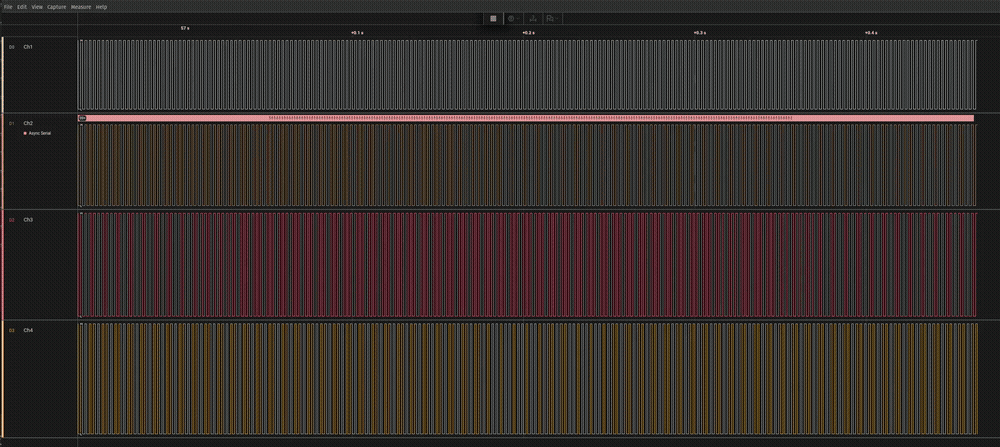
Optional: Hook up a logic analyzer to the PWM pins that have been configured as motor outputs to visualize the PWM signals being sent to the motors before testing with motors connected.
- Arm the drone by running
commander arm, you may need to pull back on the controller throttle as directed byQGroundControl. - Start the Pictorus module by running
pictorus_module start. This will start the Pictorus module, running the model and publishing motor commands to theActuator MotorsuORB topic.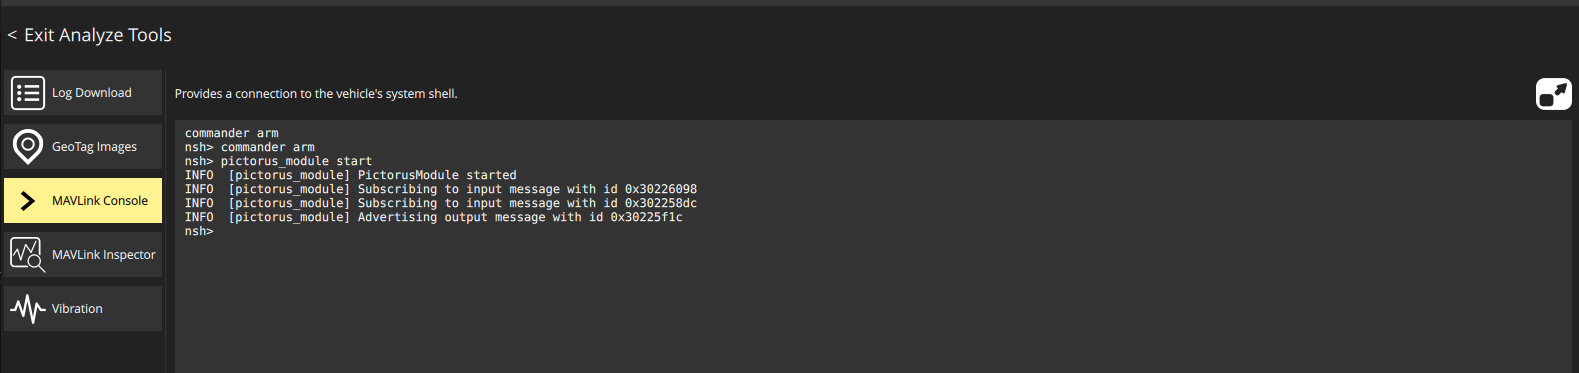
- Gently provide some throttle to see the motors spin up and observe the motors when changing the roll, pitch, and yaw inputs. The movie below shows the logic analyzer software acquiring the PWM signals from the Pixhawk 6X-RT running the Pictorus module.
- To stop the Pictorus module, run
pictorus_module stop.